Transcription
Hi guys, Simon here. In this video, we’re going to look at converting variable frame rate clips into constant frame rate. While most editors like DaVinci Resolve or Premiere Pro handle variable frame rate files without an issue, there are some features like creating proxy files in Premiere Pro that just don’t work very nicely when using variable frame rate files. I’ve got a 4K screen recording clip that I recorded a little while ago using Camtasia.
Now it was set to 30 frames per second, but I was doing some fairly CPU intensive tasks and it looked like my PC couldn’t keep up with what I was trying to record. So I started dropping some frames, which I didn’t realise until I went to bring the clip into Premiere Pro and it showed that rather than 30 frames per second, it was a 26.47 frames per second clip.
If I try to create a proxy file from this variable frame rate file, Adobe Media Encoder just sits there, chews through all my free RAM and then starts paging all my free hard disk space into its page file. So, and eventually just crashes and doesn’t create the proxy file. So in order to use the variable frame rate file in Premiere F for creating proxies, the solution is to transcode that variable frame rate file into a constant frame rate file using a tool called Handbreak. Then we can re-import it back into Premiere Pro and create our proxies without any problem.
Let’s jump over to the PC and have a look. Okay, so to show you what I was talking about with the Media Encoder, we’re in Premiere Pro. And if we look down, I’ve imported in my MP4 clip and we can see that the frame rate is 26.47 frames per second. If we right click and go up to proxy and create proxies, we’ll select just one of the standard built-in proxy presets for Media Encoder and then click on OK.
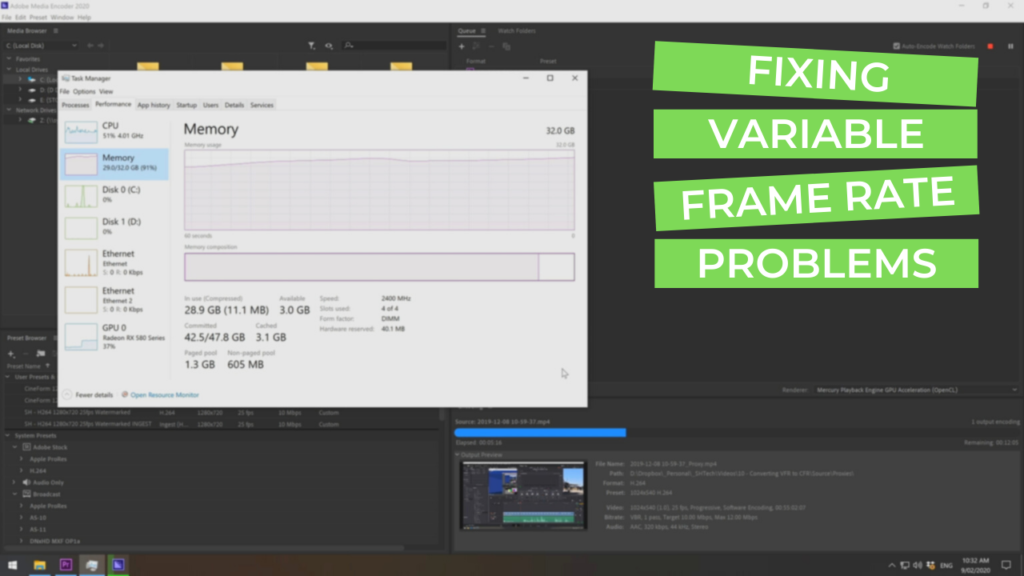
That will start up Media Encoder and start trying to create the proxy file. Now, if we switch over to my task manager on my PC, you can see here that I’ve currently got 18.5 gig of free RAM. And you can see immediately that the RAM starts to be used up. So if we go back to Media Encoder, we can see that it has started to encode the file. Now, if we keep an eye on the task manager and look at the memory, we can see that it immediately starts just chewing up any available memory.
Now, on a standard constant frame rate file, while Media Encoder will use up some RAM, it won’t just completely chew up any available RAM that’s left over. So if we keep monitoring this for a little while, and I’ll let it run for a few minutes, we can come back and have a quick look and see what it’s done. Okay, so we’re now about five minutes into Media Encoder trying to create the proxy. And you can see that the memory’s now down to about three gig free. So it’s at about running at about 90% RAM usage. So once it swallows up the rest of that RAM, it’ll start creating a page file.
You can see it started to already chew up free disk space. If we keep refreshing on the C drive, it’s just paging more and more data to disk. So what will happen is in about four or five minutes, this will completely fail and come up with an error. So we’ll shut this off for now. And no, we don’t wanna finish the current file, we just want it to stop. So if we close this back down and refresh, we can see we’re getting all our free disk space back that went to the paging file and our RAMs drop right back down to 26 gig free.
So now in order to do this another way, we use a tool called Handbrake, which is a free tool. And I’ll put a link in the description to the website to download Handbrake. Okay, so to transcode a file using Handbrake, we just click on the left menu to open a file, paste in our path, select the file that we want to transcode, it’ll then scan the file and show us a preview. Now, there are a number of presets that we can follow. So we can go in and select the closest one to what you want to do. I have a couple of custom presets.
So if we went in and said, well, let’s go very fast, 1080, and we can see we want to keep it as MP4 format, we want to align the audio and video, we don’t necessarily need to make it web optimized at this point. The dimensions, it’s currently a 4K file. So you can either leave it at 4K or drop it down to 1080, which we’ll do because we only need a 1080 file filters, I don’t typically change. Video, we want to leave as H.264. Now, this is where we want to set our frame rate to our desired frame rate.
Now, I’m in Australia, so we want to set this to 25 frames per second and set constant frame rate. Now, under our encoder profile, we want to set that to high and for a 1080 file, we can set this to 4.2 for our encoder level. That’ll give us the best quality file that we can get. I don’t typically change anything in the audio because it’s picked up the correct codec and everything. Now, we can save this preset if we like. I don’t want to save that at this point ’cause I’ve already got some presets. So now we just click on Start Encode and the video will start encoding and it shows us down the bottom here where it’s being saved.
We could have changed that if we wanted to, but that’s a perfectly fine folder for it to save into. And you can see down the bottom where what it’s actually doing with its encoding, it’s now 1% of the way through and it tells you the frames per second that it’s transcoding at and gives you an estimate of the time remaining. So we’ll pause the video here and come back when the transcoding is complete.
Okay, so now our transcoding has completed. We can see Q finished. And if we switch back to the output folder, we can see we’ve got our MP4 file. It’s considerably smaller because we’ve changed it from a 4K file to a 1080p file. And if we look at the details, we can see it is in 25 frames per second. So if we copy this into our source folder for our project and then drag it into Premiere’s project folder, we can now see it reports as 25 frames per second. So now if we right click, go to proxy and create proxies, select our same preset as last time, click on OK, and run our media encoder.
This will go through and quite easily and quite happily create the proxy file for this file. So once the transcoding of the proxy starts on the constant frame rate file, you can see that the memory stays level and it’s happily and quite quickly creating the proxy file. Thanks for watching. If you enjoyed this clip, please remember to like the video and subscribe to the channel for more videos just like this one. Thank you.