Using Redis cache in Windows Azure to save session state for an ASP.NET Core web app is quick and easy to configure.
Create your Redis Cache in Azure
Firstly, if you don’t have an Azure account create a Free Azure Trial Account. Once you’re logged into your Azure account, Click the + Create a resource button in the left menu. Enter “Redis Cache” and press enter.
You should be taken to the Redis cache information blade. Click the Create button at the bottom to create your cache.
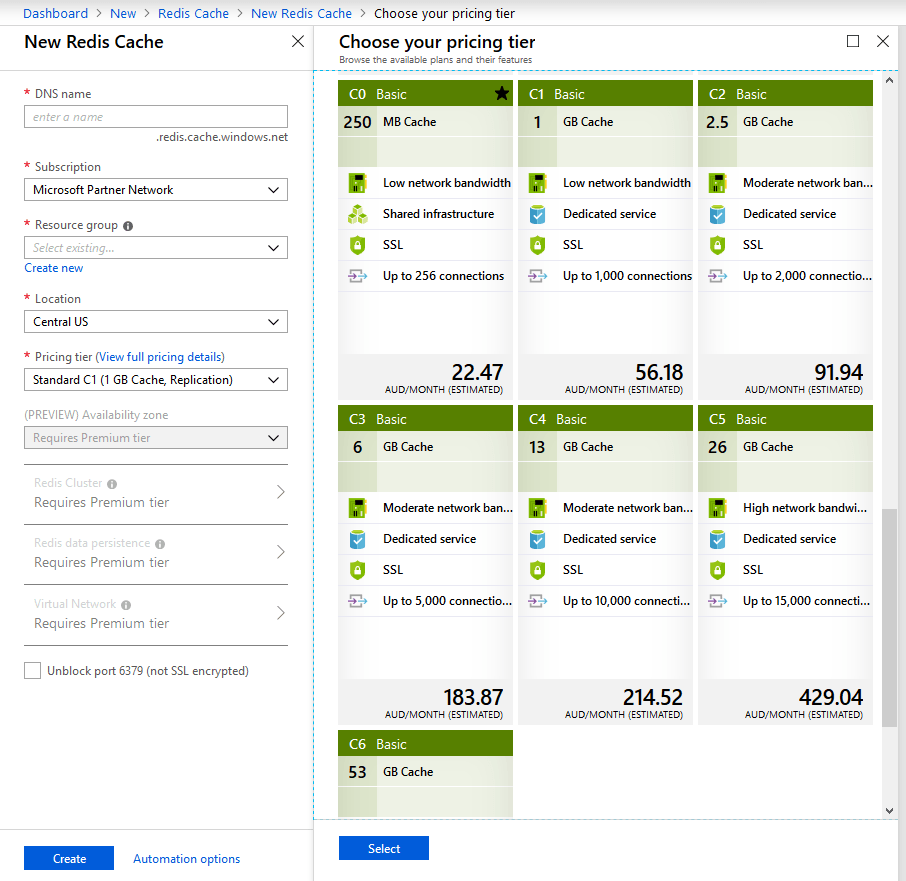
Give your cache a name, select your subscription, add or select a resource group, and select the location you want your cache in.
As you can see in the screenshot above, you have a large range of pricing options from around $20 a month up to thousands of dollars a month.
For a basic web app, I would certainly advise at starting at the lowest level and increasing as your needs change.
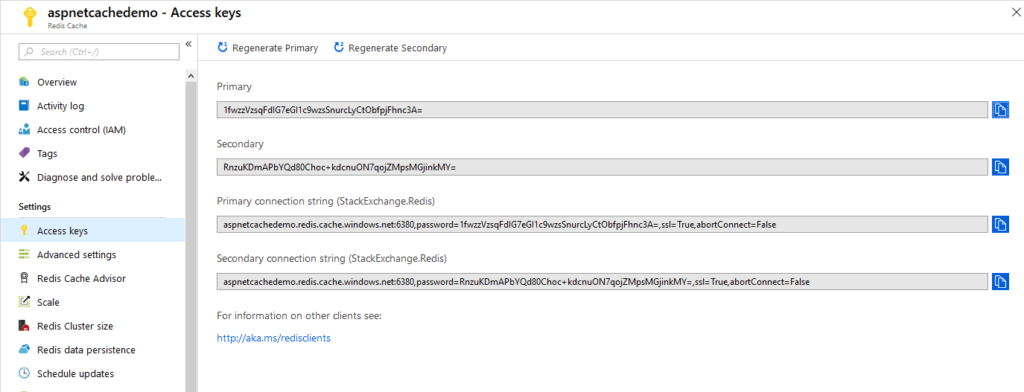
Once your cache is created, open your cache from the resources list and select Access Keys from the Settings section of the Cache settings. You can then copy the Primary Connection String (StackExchange.Redis) connection string.
Join the mailing list to stay up to date with published articles
Create your ASP.NET Core Web App
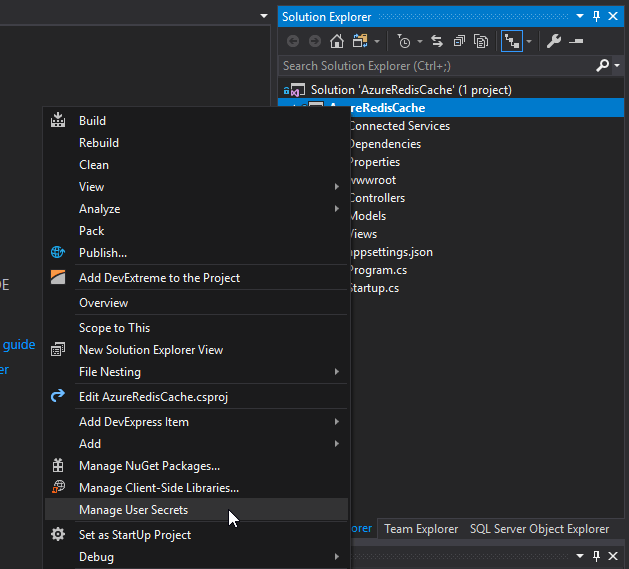
Create your new ASP.NET Core 2.2 Web App in Visual Studio 2017. Right click on your solution and click on Manage User Secrets to create a user secrets file for your application.
It\’s a good habit to get into to immediately create this file and store any important connection related or security sensitive information in it.
If you start by hard coding keys into your code to just get it working with the aim to refactor out later, you run the risk of either forgetting entirely, or accidentally committing connection information into source control.
Add the following to your user secrets and save the file. Replace the actual connection string with yours of course.
{
  "ConnectionStrings": {
    "RedisCache": "Redis Connection String from Azure"
  }
}
Back in Visual Studio 2017, Right Click on References and Manage Nuget Packages. Click Browse and search for “Microsoft.Extensions.Caching.Redis” and install the package.
Once you have this installed, go into your Startup.cs file and add the “services.AddDistributedRedisCache” and “services.AddSession” sections to the Configure Services function before the call to AddMvc().
As you can see, the options argument when adding the DistributeRedisCache is configuring the connection string we set above in the usersecrets file.
        public void ConfigureServices(IServiceCollection services)
        {
            services.Configure<CookiePolicyOptions>(options =>
            {
                // This lambda determines whether user consent for non-essential cookies is needed for a given request.
                options.CheckConsentNeeded = context => true;
                options.MinimumSameSitePolicy = SameSiteMode.None;
            });

            services.AddDistributedRedisCache(options =>
            {
                options.Configuration = Configuration.GetConnectionString(\"RedisCache\");
            });

            services.AddSession();

            services.AddMvc().SetCompatibilityVersion(CompatibilityVersion.Version_2_2);
        }
In your Configure function, you need to add app.UseSession to activate the session storage in the application.
public void Configure(IApplicationBuilder app, IHostingEnvironment env)
        {
            if (env.IsDevelopment())
            {
                app.UseDeveloperExceptionPage();
            }
            else
            {
                app.UseExceptionHandler(\"/Home/Error\");
                // The default HSTS value is 30 days. You may want to change this for production scenarios, see https://aka.ms/aspnetcore-hsts.
                app.UseHsts();
            }

            app.UseHttpsRedirection();
            app.UseStaticFiles();

            app.UseSession();

            app.UseCookiePolicy();

            app.UseMvc(routes =>
            {
                routes.MapRoute(
                    name: \"default\",
                    template: \"{controller=Home}/{action=Index}/{id?}\");
            });
        }
To use the session storage, you need to Load the session, read or write session data, then save your session. If you don\’t manually call the LoadAsync and SaveAsync methods, the session will load from the Redis Cache synchronously.
Below is an example of loading session, looking for a value in the session, creating it if it doesn\’t existing, saving it back to the session, and displaying it in the view.
public async Task<IActionResult> Index()
        {
            await HttpContext.Session.LoadAsync();

            var sessionstartTime = HttpContext.Session.GetString(\"storedSessionStartTime\");

            if (sessionstartTime == null)
            {
                sessionstartTime = DateTime.Now.ToLongTimeString();
                HttpContext.Session.SetString(\"storedSessionStartTime\", sessionstartTime);
                await HttpContext.Session.CommitAsync();
            }

            ViewBag.SessionStartTime = sessionstartTime;
            return View();
        }
And the corresponding Index.cshtml view simply shows
<div class=\"text-center\">
    <p>Session started at @ViewBag.SessionStartTime</p>
</div>
You can find the example source code for this post at https://github.com/sholman/AzureRedisCacheExample


Pingback: Azure Cache as a session data store in C# and MVC | Jeremy Lindsay
Hi,
Very helpful article to configure Azure Redis Cache with .NET Core web application.
I’ve tried to configure one Azure Redis cache instance and .NET Core application by following the steps given here.
I first tried by installing Redis Server in Windows, that works well. Then I tried creating Azure Redis Cache and used it in application hosted in dev environment, that too works well.
Our UAT & Prod have load balancers configured. And there Redis Session store is not working as expected. I’m facing issue of frequent session timeout.
Can you suggest me what am I missing?
Following is the current implementation:
Startup.cs
services.AddDistributedRedisCache(options =>
{
options.Configuration = Configuration.GetConnectionString(“RedisCache”);
options.InstanceName = “SampleInstance”;
});
services.AddSession(options =>
{
options.IdleTimeout = TimeSpan.FromMinutes(30);
options.Cookie.Name = “SessionCookie”;
});
Added app.UseSession(); in Configure method.
In HomeController Login Action,
HttpContext.Session.SetString(“UserId”, loggedInUser.UserId.ToString());
HttpContext.Session.SetString(“CompanyCode”, loggedInUser.CompanyCode.ToString());
It works in Local & Dev, but fails on environment where Load Balancer is configured.
Please suggest if I’ve missed something.
Thanks in Advance!
Priya